Our puppies, Fry & Leela LOVE snow!
Thursday, December 8, 2011
Tuesday, October 4, 2011
It's been a while...
Why hello there!
If you've stuck around this long with me, thank you! I apologize for my long absence! The past few months have been crazy hectic, I haven't even been able to work on my scrapbook(s) since April! I've been busy with my photography, both shooting, as well as diving into doing art fairs this year! I have been on a huge learning curve through it all and think I am finally ready to resurface! With the fairs becoming fewer as the months grow colder(not to mention, darker!) I am shifting some of my focus back into my scrapbooking and card making! I found that the cards I made earlier in the year didn't necessarily all get used up like I had planned, and I have more ideas coming, so I decided to open up an Etsy shop based upon my excess and other spontaneous ideas that may spurt forth as the days go on. If you'd like to check out what's in there, you can here: http://www.ScrapAboutLove.etsy.com
Beyond that, right now, I don't have much else. I'm planning on shooting some photos of the cards I have to put up on there, and then coming back to my work area to tidy up and hopefully start some new things!
Stay tuned!
Jennifer
Tuesday, May 3, 2011
My first green crab.
This past weekend I helped our neighbor celebrate her son, Miles, 5th birthday. Before this, I didn't know all too much about Ben Ten - granted, I've been out of the cartoon loop a few years now, lol. Still, the theme was pretty cute overall, with all the kids having a blast, and the parents seemed to enjoy themselves as well.
My help came in the form of the birthday cake. At first, I had no idea what it was I should do, as I was unfamiliar with Ben 10 and well, when I went to the store, I decided I'd look for some small character figures for the top of the cake and couldn't find any!! Seems kind of odd given the cartoon's seemingly popular status with Miles and his friends. I did, however find some higher end, really expensive toys(you know, the ones boys break within a day's use). With that still, I knew I at least wanted to get some letters for the words on the cake - I didn't want to do them by hand this week as I really didn't want to mess those up. So I ended up with some blue and green sugar letters. I will say the toys I did find, did inspire me - I was able to see what the logo looked like in person. So on the way home I realized that the logo would fit perfectly on a round 9" cake and that I could (duh!) research the logo online.
Once home I cleared the counter and got to work. I mixed the batter and put it in the oven, and while the layers were baking I set to do my research. Since I didn't want to have to do my decorating in my office, where my computer is, I did a small hand sketch and put it in the kitchen next to my work area.
This is what I came up with:


I also ended up making him a card - After I couldn't find what I wanted in toys, I didn't bother looking for a Ben10 related card! lol. So this is where the "green crab" comes from.
At the latest crop I attended, I picked up an awesome beach theme set of stamps from the Stampin' Up rep that was there. I probably got up and looked at them a half dozen times -I had to have them. I think I managed a decent adaptation into Ben10(note the logo'd up claws).


Hope you have enjoyed my weekend's projects!
Until next time,
Jennifer
Tuesday, April 19, 2011
Craft[-y photo]
I was inspired by a TTV image by etsy user: HeyHarriet on Etsy:
http://www.etsy.com/listing/54199105/seagull-4-through-the-viewfinder-ttv
My take on the TTV style with props on hand:
 Located:
http://photo.net/photodb/photo?photo_id=12982354
& http://www.flickr.com/photos/jenniferleighphotography/5634840866/
http://www.etsy.com/listing/54199105/seagull-4-through-the-viewfinder-ttv
My take on the TTV style with props on hand:
http://photo.net/photodb/photo?photo_id=12982354
& http://www.flickr.com/photos/jenniferleighphotography/5634840866/
Sunday, March 13, 2011
Challenge Me Monday #50
For this week's Fantabulous Cricut Challenge Me Monday tree-mendous challenge I opted to do a birthday card for my co-worker.
Matt(my co-worker)took an entire week off for his birthday(!) so I used his trip as the theme for the card. He went on a road trip from Metro Detroit to Tennessee into the smokey mountains somewhere. So the scene I wanted to depict, was putting the big city behind him, heading into the country


Matt(my co-worker)took an entire week off for his birthday(!) so I used his trip as the theme for the card. He went on a road trip from Metro Detroit to Tennessee into the smokey mountains somewhere. So the scene I wanted to depict, was putting the big city behind him, heading into the country

Edit, More Pics:


Recipe:
5"x6.5" Folded white cardstock card
Behind skyline: Dark Blue cardstock
City skyline: black cardstock, with yellow/orange stickynotes to highlight windows - Cut from Going Places
Trees: green & brown cardstock, inked with marker & stamp pads for dimension - Cut from Everyday Paper Dolls (tree tops popped up with pop dots)
Green hills & grey road(inked for dimension and grit look) cut by hand
Car: Shiney silver cardstock, with light blue(window), black(grille & tires), and yellow(headlights) cardstock for detail - Cut from Going Places (popped with pop dots)
Inside of card reads "Hope you had a great trip and an awesome birthday!"
Hope you(and my co-worker) have enjoyed this card ~ it is officially past my bedtime! ~ hopefully I can take new/better pictures in the morning!!
Goodnight :o)
Also entering into City Scapes are on the rise challenge at Moxie Fab World
Sunday, March 6, 2011
Challenge Me Monday: #49
This week's challenge over at Fantabulous Cricut was: To create a shaped card, other a square or rectangle.
For my card, I used Slimey from Mini Monsters. (All the details are done with my pens.) I ended up making two sizes, one I used wiggle eyes, and the other I used the original eyes... which turned out great for this project as they appear more like a black eye. As a non-traditional card, my thoughts for the use of this card would be to use it as a party invitation to watch a Red Wings Playoff game(or regular season too).
On to the photos!


Hope you enjoyed my project, thanks for stopping in!
Jennifer
Friday, February 11, 2011
To My Valentine
Howdy!
Today's post is yet another short and sweet one ~ Here is the Valentine I am planning on giving to my hubby on Monday(at least, as of right now that is :) ). I'm thinking, since we both have to work on Monday - like everyone else, I may just pack it in his lunchbox so he may find it whilst at work. . .
Pictures!


How I Made it:
Red Cardstock, silver sparkled cardstock, rosey wire edged ribbon, & stampendous Changito stamps
Thanks for tuning in!
Until next time,
Jennifer
Sunday, February 6, 2011
Yummy Hearts Challenge
Happy Superbowl Sunday!
Today's post features another Valentine's Day themed card I just finished. I've really been digging the Valentine theme this year! (I have a feeling I will be sad once the 14th comes and passes.) Anywho, I hadn't originally conceived this card to go towards a challenge, but have found that it will fit perfectly with The Paper Variety's challenge, which is, Yummy Hearts!
I've been working on the layering concept of patterns/colors/stamping/etc. and while I have seen A LOT of fabulous cards around featuring the technique, I find myself still a bit overwhelmed when I try it on my own - though I am getting there! So as busy as it could be, I did my best to keep the card simple and on track with my Valentine theme.
Here's the Pictures:


How I made it:
Background
Michaels dollar bin stamp in red on white cardstock
Bright red strip at bottom
For the red with hearts banner I used a glitter red paper and Recollections border punch (both from Michaels)
"Sweetheart" sentiment and hearts are Studio G clear stamps on a thin white cardstock strip
Hope you have enjoyed this sweet & simple card, would love to hear your thoughts on it too!
Until next time!
Jennifer
Also entering into: Paper Playtime: CH #37 "Use Cupid, or hearts"
Saturday, February 5, 2011
Go Wings!
Howdy,
Today's post is just a simple one. I decided that since I am proud my husband has found a sport he thoroughly enjoys(finally! ;) ), that I would make something for the occasion. Since we are near Hockeytown, I made the Red Wing's playoff's mascot, "Al" the octopus. My version of course is a very friendly looking one though; See:

I used the Mini Monsters cart to make him, and then duplicated the cut to create and modify the jersey. I used a gel pen for the white parts of the jersey, and drew on the Wing's logo. I'm still deciding whether or not I want to add more detail to Al as far as tentacles and shadows... We shall see.
Hope you've enjoyed this post & I'll catch you next time!
Jennifer
Monday, January 31, 2011
Happy Birthday, Grandma!
Hi All!
Thanks for stopping in! Today, I have a birthday card project to share with you. As you can see from the images below, it was created for my Grandma. She will be celebrating her birthday on Wednesday - the same day as Ground Hog's Day(I did a spring time feel for this one in hopes of winter being soon behind us-Regardless of this approaching winter storm!! LoL). Anywho, I think it turned out pretty cute, as my idea was to have the little person holding a somewhat larger-than-life cake as a present to hopefully brighten her day when she opens it. One of my favorite parts of this card is, when you look at it straight on, you can see the eyes peering through behind the candles. Stay tuned after the pictures for info on how I made it.


How it was made:
Background:
Blue cardstock
Grass & bushes cut from Everyday Paper Dolls
I used pop-dots on the grass layer to give it some depth
Person:
Cut at 4.5" from Everyday Paper Dolls
I used corresponding cricut markers to add to bring out some detail
I used a thin black Sharpie marker for the nose, mouth and eyebrows(So wanting Peachy Keen Stamps!)
On the blue jeans, I used my glittery chalks to give depth & highlights, as well as used a gel pen at the ankles
Cake:
Cut at 2.5" from Stretch Your Imagination
I used corresponding cricut markers on the layers
I used pop-dots on some of the cake layers for depth, and for the flames on the candles
I also put some glitter glue on the candle flames to make them stand out even more
Cut "Grandma" from Jubilee at 1"
Inside:
"Happy Birthday" stamped sentiment white ink on black paper, cut out and then pop-dots for a bit of depth
Where I'm submitting this project:
Cooking with Cricut Birthdays Challenge 15
My Pink Stamper Something Yummy
Friday, January 21, 2011
Valentines Day
Hello again to all my fellow Crafters!
Hardly seems like it has been time enough to be posting a 3rd project already! Time sure has been flying faster than I can blink my eyes, but alas we all make do as best we can. Anyways, as I was saying today I am sharing with you my third project installment, which is a Valentine's Day themed card. Now, I am normally a layout making type girl, to put it simply, because I believe they are a lot more work. This one in particular, however, was worth the results. I am excited to start utilizing stamps and patterns in my projects, as I had been having a hard time conceptualizing how to implement them, so yay for getting to use my stamps!...
On to the pictures!


How I made it:
Background:
Basic white card stock card - This one measures 3.25" x 5.5"
"xoxoxoxoxoxo" Gstudio clear stamp with red ink fills the front side of card
Pink card stock
Red card stock
Flowers:
Cut with "Stretch Your Imagination"
Center - 3"
Left & Right of Center - 2.5"
Outer Left & Right - 2"
Heart shaped brads - ProvoCraft Bradletz(originally pink, colored with silver Sharpie marker) - I honestly thought I would never use these as they came with an eBay order a loooong time ago
Pop dots behind the red flower's petals for depth
Sentiment Banner at bottom
White card stock
2 pieces of pink ribbon cut to width of card, placed side by side
another white card stock piece cut thinner centered on the ribbons
"Happy Valentines Day" sentiment stamp from Michael's
Main Attraction:
Heart catching monkey Stamp by Stampendous from Archivers - colored in with my chalk set
Where I've submitted:
Cooking With Cricut Challenge #13–3 Flowers
Wee Memories Challenge #39 - Sponsored by May Arts
ScrapbookSteals“Who’s ready to ditch winter? I know I am! (MCM #16)”
Cricut Cardz Challenge #59
Sunday, January 16, 2011
"Winter Warmies"
Hello Again!
First off, I would like to thank all of you who took the time to check out my first post. It was quite delightful to read comments from all of you ladies who share in the enjoyment of scrapbooking and being crafty. I never knew quite how far reaching this community was until now. I really appreciate all of the encouragement, and enjoyed reading each and every comment left for me - I still can't believe I manage to squeak out a Top 5 with so many other wonderful projects posted - for this, I would like to say thank you once again.
Secondly, (for the real reason you are here, most likely) I thank you for stopping in either for the first time, or returning once again to see my second post, and my second challenge entrance into the FCCB's "Winter Warmies" challenge. This challenge needed to include some type of winter clothing/accessory on the project.
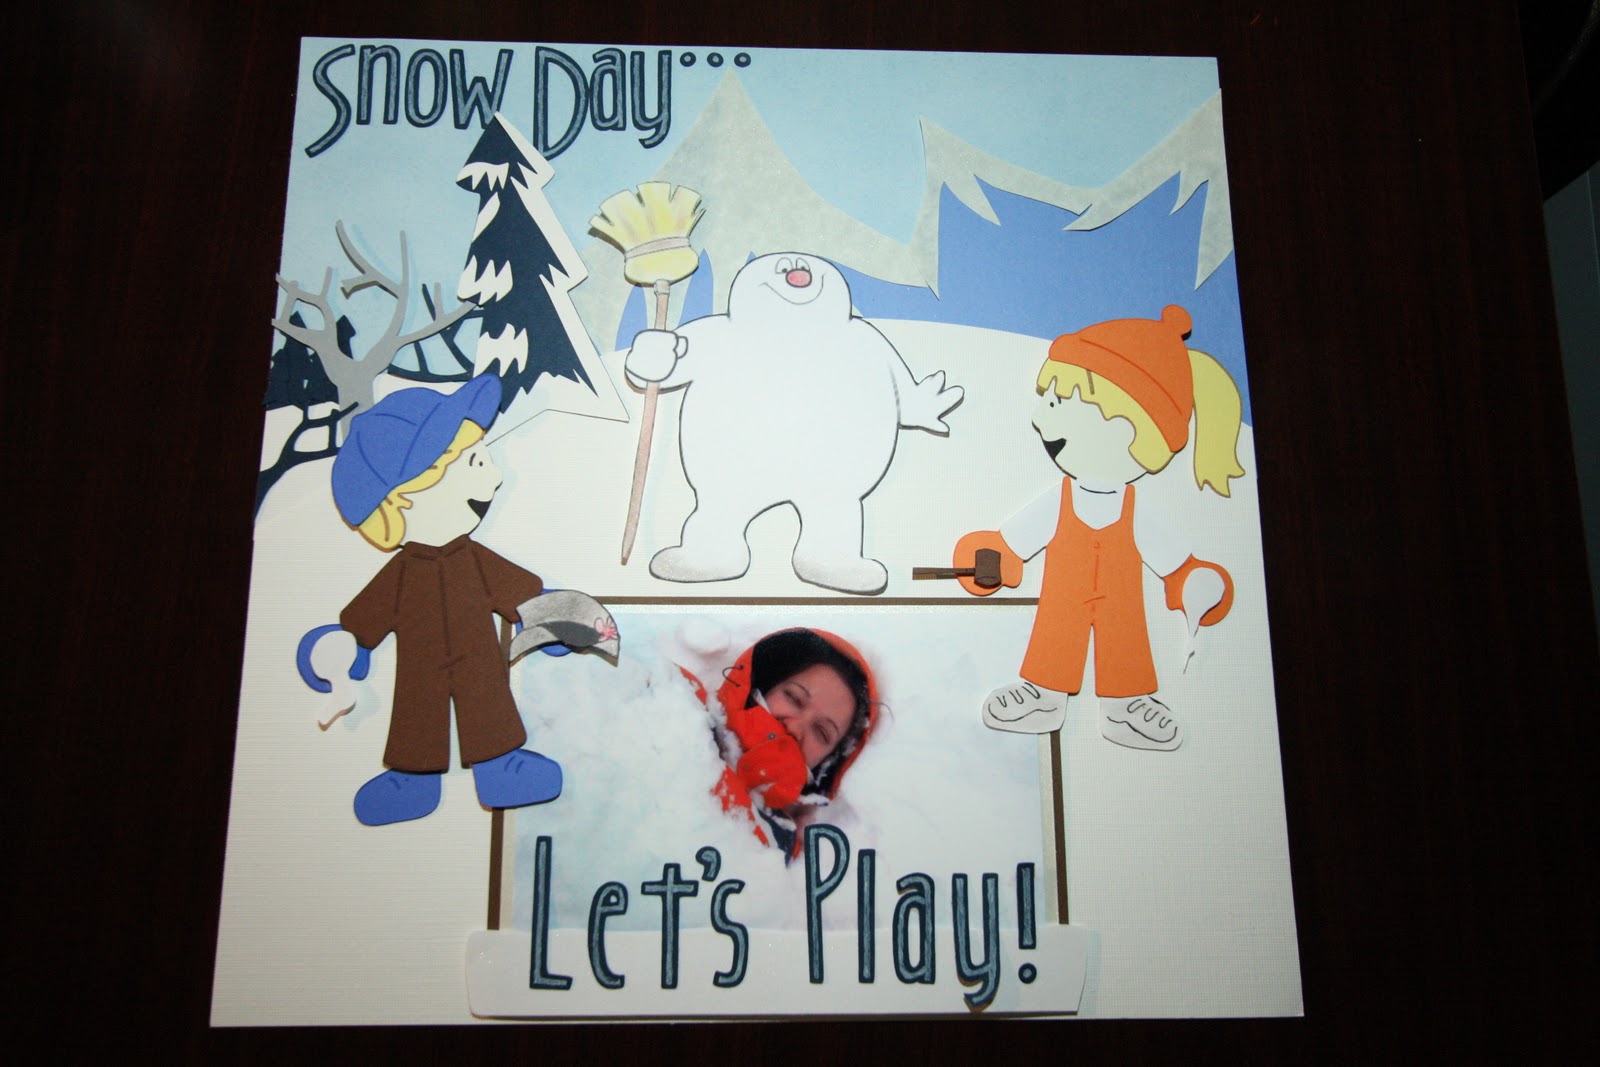
My original idea was to create a layout of two people(namely, my husband & I) building a snowman. I took it one step further by incorporating one of my all-time favorite winter specials, "Frosty, The Snowman." I figure, how better could I put the two together than this?
Now, for the photos!
Finished:


Cricut Cuts:
People - Everyday Paper Dolls (Pop Dots behind heads & items in hands)
Bare Tree - Jubilee
Small background trees & big backgound tree - Doodle Charms
"Snow Day. . . Let's Play!" - Jubilee (White Gel Pen hand filled)
Freehand:
Frosty & his hat- Made him in Photoshop, hand cut, color added with various chalk tones(Pop dots behind head, hands, broom)
Snow balls in kid's hands
Frosty's pipe - hand cut/detailed with pen White Hills
Blue Mountains with Snow(shadows added with blue chalk, and highlights done with sparkly white chalk)
Photo Frame for 4"x6" snow edge(pop dots)
As for inspiration, I found this after I did my layout, but it is basically what I had in my head...

Also entering "Glittermania" (All of the chalks I used have sparkle/glitter in them, though they don't apparently photograph all too well)
Sunday, January 9, 2011
Snowy Delights
Hi All!
Here is my first ever post/submission - This is my project for the Snowy Delights challenge from Fantabulous Cricut.
I gathered my idea from memories of my husband and I hit the slopes for the first time. We rented skis for him and a snowboard snowboard for myself. To make a long story short, it was quite a bit of fun even though we were ready for some hot cocoa and a massage by the end of it. Now if only I could locate an actual photograph from that day... or we may have to go again to recreate it..
Anyways, on with the project photos!


Also entering into Snow Fun
Snow Flakes
Snow Theme
Here is my first ever post/submission - This is my project for the Snowy Delights challenge from Fantabulous Cricut.
I gathered my idea from memories of my husband and I hit the slopes for the first time. We rented skis for him and a snowboard snowboard for myself. To make a long story short, it was quite a bit of fun even though we were ready for some hot cocoa and a massage by the end of it. Now if only I could locate an actual photograph from that day... or we may have to go again to recreate it..
Anyways, on with the project photos!


How my project was made:
Freehand:
Snow hills
Photo Frame
Faces
Cricut Cuts:
People/accessories - Everyday Paper Dolls
"You&Me" - Don Juan
"Winter Fun" - Don Juan
Snow Flakes - Doodlecharms & Don Juan
I also used some stamping inks to get dimension on clothing, some pop dots for dimension on the snow flakes, and black chalk to similate a slight shadow under the people. Also entering into Snow Fun
Snow Flakes
Snow Theme
Subscribe to:
Posts (Atom)